Переносим CentOS5 с VirtualBox под Hyper-V и ставим Linux Integration Services. Конфликт Hyper-V и VirtualBox. Ошибка «Не удалось открыть сессию для виртуальной машины Импорт виртуальной машины
В данной статье мы рассмотрим несколько способов повышения производительности виртуальной машины VMware Workstation, Oracle VirtualBox, Microsoft Hyper-V или любой другой. Виртуальные машины довольно требовательны к характеристикам компьютера, ведь во время их работы на ПК одновременно запущено несколько операционных систем. Как результат, виртуальная машина может быть значительно медленнее основной операционной системы или вообще работать с притормаживанием.
В данной статье мы рассмотрим несколько способов повышения производительности виртуальной машины , Oracle VirtualBox, Microsoft Hyper-V или любой другой.
Содержание:Динамический или фиксированный виртуальный жесткий диск?
Создавая виртуальную машину, можно создать два разных типа виртуальных жестких дисков. По умолчанию виртуальная машина использует динамический диск, который занимает необходимое место на физическом носителе информации и увеличивается лишь по мере заполнения.
Например, создавая виртуальную машину с динамическим диском в 30 ГБ, он не займёт сразу же 30 ГБ жесткого диска компьютера. После установки операционной системы и необходимых программ его размер будет порядка 10-15 ГБ. Лишь по мере добавления данных, он может увеличиться до 30 ГБ.
Это удобно с той точки зрения, что виртуальная машина будет занимать на жестком диске место, которое пропорционально объёму хранимых на ней данных. Но, работа динамического жесткого диска медленнее фиксированного (иногда также называют распределённым).
Создавая фиксированный диск, все 30 ГБ на жестком диске компьютера будут выделены под диск виртуальной машины сразу же, независимо от объёма хранимых на нём данных. То есть, фиксированный жесткий диск виртуальной машины занимает больше места жесткого диска компьютера, но сохранение или копирование файлов и данных на нём происходит быстрее. Он не так сильно подвержен фрагментации, так как пространство под него выделяется максимально большим блоком, вместо того, чтобы добавляться маленькими частями.

Установка пакета инструментов виртуальной машины
После установки на виртуальную машину гостевой операционной системы, первое, что необходимо сделать – это установить пакет инструментов или драйверов вашей виртуальной машины, например: VirtualBox Guest Additions или VMware Tools. Такие пакеты содержат драйвера, которые помогут гостевой операционной системе работать быстрее.
Установить их просто. В VirtualBox, загрузите гостевую операционную систему и выберите Устройства / Подключить образ диска Дополнительной гостевой ОС… «Этот компьютер»


В VMware Workstation, выберите меню Виртуальная машина / Установить паке VMware Tools… После чего запустите установщик, который появится как отдельный диск в папке «Этот компьютер» гостевой операционной системы.


Добавьте папку с виртуальной машиной в исключения вашей антивирусной программы
Антивирусная программа кроме прочих, также сканирует файлы виртуальной машины, что снижает её производительность. Но дело в том, что антивирусная программа не имеет доступа к файлам внутри гостевой операционной системы виртуальной машины. Поэтому такое сканирование бессмысленно.
Чтобы избавится от снижения производительности виртуальной машины, можно добавить папку с ней в исключения антивирусной программы. Антивирус будет игнорировать все файлы такой папки.

Активация Intel VT-x или AMD-V
Intel VT-x и AMD-V – это специальные технологии виртуализации, которые предназначены для обеспечения большей производительности виртуальных машин. Современные процессоры Intel и AMD, как правило обладают такой функцией. Но на некоторых компьютерах она автоматически не активирована. Чтобы её включить, необходимо перейти в BIOS компьютера и активировать её вручную.
AMD-V часто уже активирована на ПК, если поддерживается. А Intel VT-x чаще всего отключена. Поэтому, убедитесь в том, что указанные функции виртуализации уже активированы в BIOS, после чего включите их в виртуальной машине.

Больше оперативной памяти
Виртуальные машины требовательны к объёму доступной оперативной памяти. Каждая виртуальная машина включает полноценную операционную систему. Поэтому необходимо разделить операционную систему вашего ПК на две отдельные системы.
Microsoft рекомендует минимум 2 ГБ оперативной памяти для своих операционных систем. Соответственно, такие требования актуальны и для гостевой операционной системы виртуальной машины с Windows. А если планируется использование на виртуальной машине стороннего требовательного программного обеспечения, то для её нормальной работы оперативной памяти потребуется ещё больше.
В случае, если уже после создания виртуальной машины оказалось, что оперативной памяти для её нормальной работы недостаточно, то её можно добавить в настройках виртуальной машины.
Прежде чем делать это, убедитесь, что виртуальная машина отключена. Также, не рекомендуется предоставлять виртуальной машине более чем 50% физически присутствующей на компьютере виртуальной памяти.

Если, выделив для виртуальной машины 50% памяти вашего компьютера выяснилось, что она не стала работать достаточно комфортно, то возможно для нормальной работы с виртуальными машинами вашему компьютеру недостаточно оперативной памяти. Для нормальной работы любой виртуальной машины будет достаточно 8 ГБ оперативной памяти, установленной на основном ПК.
Выделить больше CPU
Основная нагрузка при работе виртуальной машины, приходится на центральный процессор. Таким образом, чем больше мощности центрального процессора виртуальная машина может занять, тем лучше (быстрее) она будет работать.
Если виртуальная машина установлена на компьютере с мульти-ядерным процессором, то в настройках виртуальной машины для неё можно выделить несколько ядер для её работы. Виртуальная машина на двух и более ядрах центрального процессора будет работать ощутимо быстрее чем на одном.

Установка виртуальной машины на компьютере с одноядерным процессором нежелательна. Работать такая виртуальная машина будет медленно и выполнение ею каких-либо задач будет не эффективным.
Правильные настройки видео
На скорость работы виртуальной машины могут также влиять настройки видео. Например, включение 2D или 3D-ускорения видео в VirtualBox, позволяет работать некоторым приложениям значительно быстрее. То же касается и возможности увеличения видеопамяти.
Но, как и в случае с оперативной памятью, многое зависит от видеоадаптера, который установлен на основном компьютере.

Виртуальная машина и SSD диск
Первым и лучшим усовершенствованием компьютера на сегодняшний день является установка на него SSD диска. Это ощутимо ускорит работу компьютера, а соответственно и установленной на нём виртуальной машины.
Некоторые пользователи устанавливают виртуальные машины на другой (HDD) диск своего компьютера, оставляя на SSD диске лишь основную операционную систему. Это делает работу виртуальной машины медленнее. Освободите место на SSD диске и перенесите виртуальную машину на него. Разница в скорости работы почувствуется с первых минут.
По возможности, не размещайте диски виртуальных машин на внешних носителях информации. Они работают ещё медленнее чем встроенный HDD диск. Возможны варианты с подключением виртуальной машины через USB 3.0, но о USB 2.0 и речи быть не может – виртуальная машина будет работать очень медленно.
Приостановка вместо закрытия
Когда вы закончили работать с виртуальной машиной, её можно приостановить вместо полного выключения.

Запуская приложение для работы с виртуальными машинами следующий раз, вы можете включить виртуальную машину таким же способом как обычно. Но она загрузится значительно быстрее и именно в том состоянии и с того места, на котором вы закончили работать прошлый раз.

Приостановка гостевой операционной системы очень похожа на использование гибернации вместо выключения ПК.
Улучшение производительности внутри виртуальной машины
Всегда необходимо помнить, что установленная на виртуальную машину операционная система мало чем отличается от той, которая работает на основном компьютере. Её работу можно ускорить, следуя тем же принципам и используя те же методы, которые актуальны для любой другой операционной системы.
Например, производительность системы увеличится если закрыть фоновые программы или те, которые автоматически запускаются при старте системы. На производительность системы влияет необходимость осуществления дефрагментации диска (если виртуальная машина расположена на HDD диске), и так далее.
Программы для работы с виртуальными машинами
Одни пользователи уверяют, что Oracle VirtualBox самый быстрый инструмент для работы с виртуальной машиной, для других – VMware Workstation или
Здравствуйте.
1. Приступая к переносу, для начала сконвертируем.vdi жесткий диск от VirtualBox в.vhd диск Hyper-V
В каталоге VirtualBox выполняем команду конвертации образа.vdi в.raw
VBoxManage.exe internalcommands converttoraw d:\project\project.vdi d:\project.raw
Ищем и ставим WinImage, запускаем, выбираем Disk -> Convert Virtual Hard Disk Image,
тип файлов *.*, открываем.raw образ, сохраняем как динамически-расширяемый образ.vhd
2. Создаем новую виртуальную машину в Hyper-V, использую Legacy сетевую карту, так как синтетическая сетевая карта не заработает до установки Linux Integration Services.
3. Удаляем VirtualBoxAdditions из CentOS
в каталоге /etc/init.d/
командой
chkconfig --del «vboxadd»
chkconfig --del «vboxadd-service»
chkconfig --del «vboxadd-x11»
Затем удаляем из каталога /etc/init.d эти файлы (vboxadd, vboxadd-service, vboxadd-x11)
4. Идем в настройки Hyper-V, ставим статический mac адрес сетевой карте
Затем в линуксе идем по пути
/etc/sysconfig/network-scripts/
редактируем файл ifcfg-eth0 (либо ifcfg-seth0) и прописываем по аналогии:
DEVICE=eth0
BOOTPROTO=static
BROADCAST=10.10.10.255
HWADDR=00:01:02:03:04 (берем из настроек hyper-v)
IPADDR=10.10.10.10
NETMASK=255.255.255.0
NETWORK=10.10.10.0
ONBOOT=yes
Либо поступаем еще проще, запускаем в консоли system-config-network-tui
и настраиваем eth0 (физический адаптер) либо seth0 (синтетический адаптер).
Перезагружаем линукс.
5. Обновляем CentOS, набираем в консоли:
yum update
yum groupinstall «development tools»
reboot
6. Качаем Linux Integration Services v2.1 for Windows Server 2008 Hyper-V R2 , распаковываем и монтируем.iso в виртуальную машину в окне hyper-v.
Установленный Linux Integration Services дает нам:
- Driver support for synthetic devices - синтетический ethernet адаптер, более быстрый чем legacy erhernet
- Fastpath Boot Support for Hyper-V - более быструю загрузку виртуальной машины
- Timesync - синхронизация времени с хостовой машиной
- Integrated Shutdown - возможность выключать линукс из оснастки hyper-v
- Symmetric Multi-Processing (SMP) Support - поддержку до 4 процессоров
- Heartbeat - возможность мониторинга состояния гостевой ОС
- Pluggable Time Source
Из нереализованного:
- Integration Services: Data Exchange, Volume Snapshot Backup
- Networking: Jumbo Frames and TCP Offload
- Storage: Hot Add/Remove (VHD‟s and Passthrough Disks)
7. Монтируем Linux Integration Services v2.1 ISO:
mkdir -p /mnt/cdrom
mount /dev/cdrom /mnt/cdrom
Копируем файлы на жесткий диск:
mkdir /opt/linux_ic
cp -R /mnt/cdrom/* /opt/linux_ic
umount /mnt/cdrom
Устанавливаем Linux Integration Services,
cd /opt/linux_ic
make
make install
Пока не перезагружаемся. Если у вас RedHat5.5 (а у нас CentOS 5.5), то нужно зайти в
/boot/grub/grub.conf файл и поменять hda=noprobe hdb=noprobe
на ide0=noprobe ide1=noprobe
. Если не поправить grub, то поймаем панику ядра после перезагрузки:
Делаем reboot в консоли и радуемся корректной работе CentOS 5.5 под Hyper-V.
PS:
Подводные камни:
1. Сперва не мог понять, почему линукс при загрузке не цепляет сетевуху от hyper-v, гугление подсказало, что нужно сперва использовать legacy сетевую карту.
2. По инструкции, которая шла с Linux Integration Services v2.1 ничего не получалось, пока не нагуглил волшебную команду yum groupinstall «development tools», пакету не хватало этих вот инструментов разработчика, ну и заодно ядра посвежее.
3. Наконец-то поставил LIS, радостная перезагрузка и… kernel panic. Вдумчивое чтение документации подсказало, что нужно править grub.
In the modern highly virtualized IT world, choosing a hypervisor that is the most suitable for your tasks is an important point. There are multiple virtualization platforms provided by different vendors, and each of them presents attractive features. This blog post explains the differences between Oracle VirtualBox and Microsoft Hyper-V. These two platforms include useful features, in addition to having similarities and differences with which you can familiarize yourself by reading today’s article.
For a complete comparison of VirtualBox vs. VMware, refer to this blog post .Hyper-V vs. VirtualBox Hypervisor Types
Hypervisor is special software that allows you to run one or multiple virtual machines with their own operating systems (guest operating systems) on a physical computer, which is called a host machine. There are two types of hypervisors – type 1 and type 2.
Hyper-V is a type 1 hypervisor that is also called a bare metal hypervisor, and runs directly on a computer’s hardware. When a physical computer (a host) starts, a Hyper-V hypervisor takes control from BIOS or UEFI. Then, Hyper-V starts the management operating system, which can be Hyper-V Server, Windows, or Windows Server. Virtual machines can be started manually by user or automatically, depending on its settings.
VirtualBox is a type 2 hypervisor that is sometimes called a hosted hypervisor. A type 2 hypervisor is an application that runs on the operating system (OS) and is already installed on a host. When a physical computer starts, the operating system installed on the host loads and takes control. A user starts the hypervisor application (VirtualBox in this case) and then starts the needed virtual machines. VM hosted processes are created.
Hyper-V is always on if the host is powered on, while the VirtualBox can be started and closed by a user on demand.
Windows-Only Hyper-V vs. Multi-Platform VirtualBox
As explained above, Hyper-V can only run on Windows family operating systems. Hyper-V feature is built-in from Windows 8 onwards, and is also available as a server role from Windows Server 2008 to later versions.
Virtual Box can run on a higher number of operating systems such as Linux, Windows, Solaris, and Mac OS. If Windows is used on the physical machines in your environment, you could preference Hyper-V. If your environment is multiplatform, then you can take advantage of VirtualBox and run your virtual machines on different computers with different operating systems.
Support of Guest Operating Systems for Hyper-V and VirtualBox
Guest operating system is the OS that is installed and runs on a VM. A guest OS and host OS may differ. Hyper-V can host VMs with Windows, Linux, and FreeBSD guest operating systems.
VirtualBox supports more guest operating systems than Hyper-V: Windows, Linux, FreeBSD, Solaris, Mac OS, and others. You can see the full list of supported operating systems versions on the official pages of the vendors.

Hyper-V Integration Services vs. VirtualBox Guest Additions
Hyper-V Integration Services is a pack of drivers and utilities that improves overall performance as well as interactions between both host and guest operating systems. Integration Services are installed on a guest OS that runs on a VM. For Windows OS, Integration Services can be installed by attaching a virtual disc image (ISO file) to the VM, which includes the installer, or via Windows Update. As for Linux, main Integration Services are built in kernel of modern Linux operating systems. Integration Services can be updated on Linux when the kernel is updated. As an alternative, you can manually download the full installation package of Hyper-V Integration Services for Linux from the Download Center .
VirtualBox Guest Additions contain system applications and drivers that, similarly to Hyper-V Integration Services, optimize a guest OS as well as improve its performance and usability. Drag & Drop, bidirectional clipboard, automatic resizing, and seamless mode become available after installing Guest Additions. Installation process is similar – attaching ISO disc image with the installer to a VM, and installing Guest Additions using GUI (graphical user interface) or command line.
Virtual Disk Format
The virtual disks of Hyper-V virtual machines are stored as VHD and VHDX files. VHD is an older virtual disk format for Hyper-V. VHDX format has been available since Hyper-V in Windows Server 2012 . There are two types of virtual disk pre-allocation: Fixed and Dynamic.
A fixed virtual disk consumes all provisioned space on storage once the disk has been created. This provisioning type is similar to thick provisioning. Read the blog post about to learn more about virtual disk pre-allocation.
Dynamic virtual disk consumes almost no storage space after creation, and grows over time when the data is written on the virtual disk. This provisioning type is similar to thin provisioning.
VirtualBox supports virtual disks of the following formats: VDI, VMDK, VHD, HDD.
- VDI is the native VirtualBox format
- VMDK is VMware virtual disk format
- VHD is Hyper-V format (VHDX is not supported by VirtualBox)
- HDD is Parallels Desktop format
You can use fixed size disks and dynamically allocated disks in VirtualBox, similarly to as you can in Hyper-V.
You can convert fixed disks to dynamic disks for both Hyper-V and VirtualBox. Fixed virtual disks need more time for creation and consume more storage space right after creation, but then provide higher performance. Dynamic virtual disks are created near instantly and allow you to save storage space, but their performance is lower than the performance of fixed virtual disks.
Hyper-V Checkpoints vs. VirtualBox Snapshots
Hyper-V checkpoint is a feature that allows you to save a virtual machine state. A checkpoint allows you to revert a VM back to its previous state before unwanted changes were made. There are two types of checkpoints available in the latest version of Hyper-V: Standard Checkpoints and Production Checkpoints. Unlike Standard checkpoints, Production Checkpoints allow you to freeze the VM to prevent write operations on the virtual disk by using VSS (Volume Shadow Copy Service) for Windows-based VMs or File System Freeze for Linux-based VMs. This approach allows you to avoid issues that can occur when Standard Checkpoints are used, such as data inconsistency. Data on a disk must not be changed when a checkpoint is taken. In a case when data is not changed during creating a checkpoint, a snapshot would be data-consistent and application-consistent .
When a checkpoint is created, a differencing virtual disk (AVHD or AVHDX) is created for each VHD (or VHDX) virtual disk of the virtual machine. All changes are written to the differencing disk after checkpoint creation. Differencing virtual disks are stored with parent virtual disks in the same directory.
VirtualBox snapshot is an equivalent of Hyper-V checkpoint. You can save current VM state with snapshots and revert to its previous state if needed. VDI is a native file format of a virtual disk used in VirtualBox. When a snapshot is created, a new differencing virtual disk is created as a new VDI file. When you delete a snapshot that represents an earlier VM state as compared to your current VM state, then a differencing virtual disk is merged with a parent virtual disk, or multiple differencing virtual disks are merged. Be aware that snapshots are used primarily for testing purposes, but not for production purposes.
Note: Checkpoints and snapshots are useful for testing and help you to revert VMs to their previous state. Don’t use them as VM backups. Read our blog post to learn more about the difference between snapshots and backups.
Hyper-V VMConnect vs. VirtualBox Remote Display
Hyper-V Virtual Machine Connection (VMConnect) is a tool that provides access to the GUI or console interface of the virtual machine with which you can manage the VM. VMConnect uses WMI (Windows Management Instrumentation) for this purpose. You can interact with the guest OS of the VM by using a keyboard and mouse similarly to interacting with physical machines. A connection to the VM can be established from the local machine on which Hyper-V is installed and the VM is running, or from a remote machine via the network. VMConnect is usually enabled by default when the Hyper-V role is installed. Otherwise, you can add the Hyper-V Tools feature in Add Features Wizard. Microsoft Remote Desktop Protocol (RDP) is used to establish a connection by VMConnect.

Enhanced session mode allows redirecting local devices and resources to a VM. Clipboard, disk drive, USB flash drive, audio, printer, and display configuration can be redirected. Thus, you can use a USB flash drive inserted into a USB port of your physical machine, in your virtual machine.
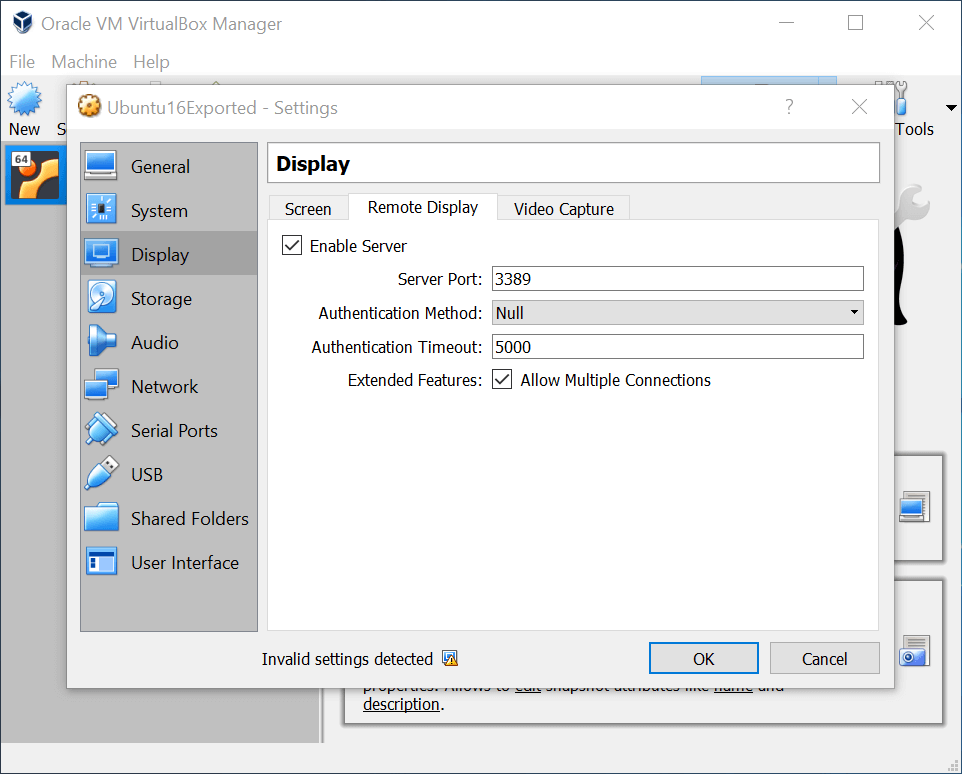
VirtualBox also contains tools for the convenient management of virtual machines. VMs that are run on the local machine can be managed with the VirtualBox GUI from the local computer. VirtualBox Remote Desktop Extension (VRDE) is the general extension interface that provides maximum flexibility with extension packages that can be developed by third parties. VRDE is compatible with Microsoft RDP. VirtualBox Remote Display Protocol (VRDP) is provided with such extension packages. This is a backwards-compatible extension to RDP that allows you to use standard RDP clients for controlling remote VMs.
To connect to a remote guest VM, you should type the IP address of the host machine and port set for a remote connection to the VM in the VM display settings. 3389 is the port number used by default. You can set different RDP port numbers for different VirtualBox VMs.
Hyper-V Live Migration vs. VirtualBox Teleporting
Live Migration is a Hyper-V feature that allows you to move running VMs from one Hyper-V host to another transparently, and without significant downtime. This feature is especially useful when you use a Failover Cluster because it helps you provide high availability for the VMs. It is recommended to use a dedicated migration network for Hyper-V Failover Cluster. VM files such as virtual disks must be located on shared storage. If you need to move VM files from one storage to another, then Storage Migration should be used.
VirtualBox Teleporting is a VM migration feature that allows you to move virtual machines from one VirtualBox host to another over a TCP/IP network, even if the VM is running. Source and destination VMs must use the same shared storage. The VM can be transferred from a source host to a target host with minimal downtime, independent from the host OS. For example, you can transfer running Windows-based VMs from a Linux host to a Solaris host or vice versa. Teleporting is available from VirtualBox version 3.1 onwards. Migration of running VMs improves the flexibility of your virtual environment.
Hardware Virtualization and Software Virtualization
Hyper-V supports hardware virtualization. Hardware virtualization is a technology that uses a hypervisor to create an abstraction layer between software and physical hardware for emulating computers. All devices needed for the proper functionality of a computer are emulated with special software. Hardware virtualization must be enabled in UEFI/BIOS on a physical machine.
VirtualBox supports hardware and software virtualization. Software virtualization can only be used for VMs with 32-bit guest operating systems that use x86 architecture. For 64-bit guest systems, only hardware virtualization may be used. Unlike most other virtualization products, due to the support of software virtualization, VirtualBox can run many guest operating systems on computers with old processors, even if those processors don’t have hardware virtualization support.
Remote Management with GUI
Hyper-V Manager is a tool with GUI that helps you to manage your Hyper-V VMs. You can create, import, configure, start, stop, and remove VMs with Hyper-V Manager, as well as perform other actions such as configuring virtual switches, virtual hard disks, creating checkpoints, connecting to the guest OS interface with VMConnect, etc. You can also connect to a remote Hyper-V Server and manage the VMs residing on that server.
phpVirtualBox is an open source tool with a web interface written in PHP that allows to manage remote VirtualBox instances with VMs. phpVirtualBox provides an interface that is the same as the GUI interface of VirtualBox, and as a result, you can manage your VirtualBox instances remotely with a browser, similarly to how you manage your local instances. This tool can be a nice alternative to VirtualBox GUI if you run VirtualBox on a headless server (a server that has OS without GUI).
Remote Management with Console Interface
Hyper-V servers can be managed with PowerShell, which is a Windows command line interface developed by Microsoft. PowerShell is a native tool for Windows, but PowerShell Core is also compatible with Linux and macOS. PowerShell Remoting must be enabled for this purpose. Using PowerShell is a way to automate Hyper-V and VM management , especially in large environments.
VBoxManage is a command line interface (CLI) for VirtualBox. You can access all the features available in the VirtualBox GUI. Moreover, you can access all features provided by the VirtualBox virtualization engine with VBoxManage (not all of the features are available in GUI). CLI can also be used for managing VirtualBox instances on operating systems without GUI (that only have a console interface). Another advantage is the ability of scripting and automating. VBoxManage is compatible with Linux, Windows, Solaris, and Mac OS.
VM Network Traffic Analyzing
Port Mirroring is a network traffic analyzing tool for Hyper-V. This feature allows you to send copies of all received and transmitted packets from one port to another for further packet analysis. The main purpose of using Port Mirroring is troubleshooting. You can create a VM that has a virtual network adapter connected to the appropriate virtual switch> port, install packet analysis software on that destination VM, and send network packets from multiple VMs to the destination VM for analysis.
VirtualBox provides a network tracing feature with which you can enable network packet logging for further analysis. As a result, VirtualBox utilizes the built-in capability and writes all captured traffic of the VM network interface into PCAP files. Later you can open these files in the traffic analysis tool such as Wireshark. This feature can be activated with a command line interface. Disable this feature after finishing investigation to prevent filling out the whole disk with PCAP files.
Shared Folders, Drag & Drop in Hyper-V and VirtualBox
Shared folders are useful for file exchange between different machines. Hence, this approach can be used for copying files from a host OS to a guest OS, and vice versa.
Hyper-V doesn’t include such a built-in feature. You can manually share the folder in your host OS with Windows GUI or PowerShell and provide access to that folder for specified users or groups used in a guest OS. You can also use a Copy-VMFile PowerShell tool in Hyper-V virtual environments as an alternative method to copy files between physical and virtual machines.
VirtualBox includes a built-in Shared Folders feature that can be easily enabled from the VirtualBox user interface. Transferring files between VirtualBox host machine and guest machine by using Shared Folders is convenient. You should open VM Settings, and then select Shared Folders. Add Share: set a folder path (the folder is located on the host machine, for example, C:\temp), enter a folder name that would be displayed in the guest OS. If needed enable or disable the following options: Read-only, Auto Mount, and Make Permanent by checking the boxes. Notice that VirtualBox Guest Additions must be installed on a guest OS.

Drag & drop is a feature for GUI that allows you to move objects such as files or folders from the one part of the screen to another. In context of the virtualization environment, Drag & Drop allows you to move files or folders from a host machine to a guest machine and inversely. Both Hyper-V and VirtualBox products support the Drag & Drop feature.
Hyper-V Integration Services (including Guest Services) or VirtualBox Guest Additions must be installed on a guest OS accordingly. The Enhanced Session Mode must be used when logging on the Hyper-V VM. In VirtualBox go to Devices > Drag & Drop and select the direction (you can select “bidirectional”) to enable this feature.
Conclusion
Both Hyper-V and VirtualBox are attractive solutions for virtualization, and the choice between them may be difficult. Hyper-V is a type 1 hypervisor while VirtualBox is a type 2 hypervisor. Hyper-V can only be installed on Windows-based systems, while VirtualBox is a multiplatform product. Hyper-V supports clustering features such as failover clustering and load balancing. Microsoft virtualization solution would be a good choice for companies that already use Windows -based environment. Oracle VirtualBox is free, supports a high number of guest and host operating systems, and hence, is suitable for multiplatform environments. Today’s blog post has explained the differences between these two virtualization solutions to help you to make the right decision. However, the choice is up to you.
Hyper-V or VirtualBox – Which One to Choose for Your Infrastructure?
5 (100%) 34 votesПараллельно тестируя их. С утра же, когда устанавливать операционные системы, оказалось, что в VirtualBox вылетает ошибка «Не удалось открыть сессию для виртуальной машины». Код ошибки на скриншоте ниже. Дескать не поддерживается технология виртуализации. Проверил ещё раз настройки BIOS для надёжности - всё в порядке. Настройки VirtualBox и виртуальной машины так же в норме. Оказалось, что просто конфликтуют две программы, а точнее Hyper-V от Microsoft забирал виртуализацию на себя. Решается эта проблема удалением Hyper-V.
Итак, ошибка вот такая:
Удаляем Hyper-V:
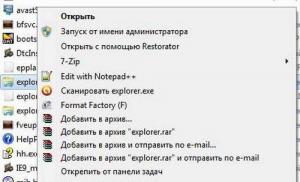
Нажимаем Win + R , вводим OptionalFeatures и нажимаем Enter . Или же открываем:
Панель управления ➝ Все элементы панели управления ➝ Программы и компоненты ➝ Включение и отключение компонентов Windows
В открывшемся окне Компоненты Windows снимаем отметку с раздела Hyper-V .
Жмём ОК и перезагружаем компьютер. После этого в VirtualBox необходимо создать новую виртуальную машину и можно начинать с ней работать.
Спасибо, что читаете! Подписывайтесь на меня в социальных сетях Facebook , Twitter , VK , OK и мессенджерах Telegram и TamTam !
Читайте анонсы и посты целиком в